

Outlet DIY: IKEA Billy Bookcase Hack
This post may contain affiliate links. As an Amazon Associate, I earn from qualifying purchases.
Today, I’ll be giving you the rundown on my IKEA Billy Bookcase hack into one of my favorite Crate & Barrel dupes. There is a reason by so many folks like to customize IKEA furniture. Their items are just such a great foundation and so easy to make truly your own. This IKEA Billy bookcase hack would make an amazing addition to your IKEA Home Office Hacks list- it looks so classy and holds so many items.
I had been drooling for months over the Crate and Barrel cabinet Kendzie Black-and-White Cabinet, but the dimensions were just a bit too wide for the space I wanted to fill. Additionally, as an ex-minimalist with my design choices, I wasn’t sold on whether or not I’m even a display cabinet kind of a gal and that $1,799 price tag isn’t for the maybe-I-could-like-this-trend cabinet buyer. I knew I had to get thrifty.

I don’t even remember how I fell down this particular DIY rabbit hole, but I eventually came across @ouracaciagrovehome’s IKEA Billy hack for this same cabinet and about fell out of my chair. Check out their Bill IKEA Hack highlight called “Billy Makeover” on their account- I watched it more times than I care to admit.

Their transformation was so inspiring, I knew instantly it was my life goal to make my own version of it. I am a very visual person, so decided to (very roughly) plug @ouracaciagrovehome’s exact cabinet into my favorite editing app, Bazaart, to see if I would like it as much in my own space. And guess what? I LOVED IT! Do you want a tutorial on how to do this too? Let me know!

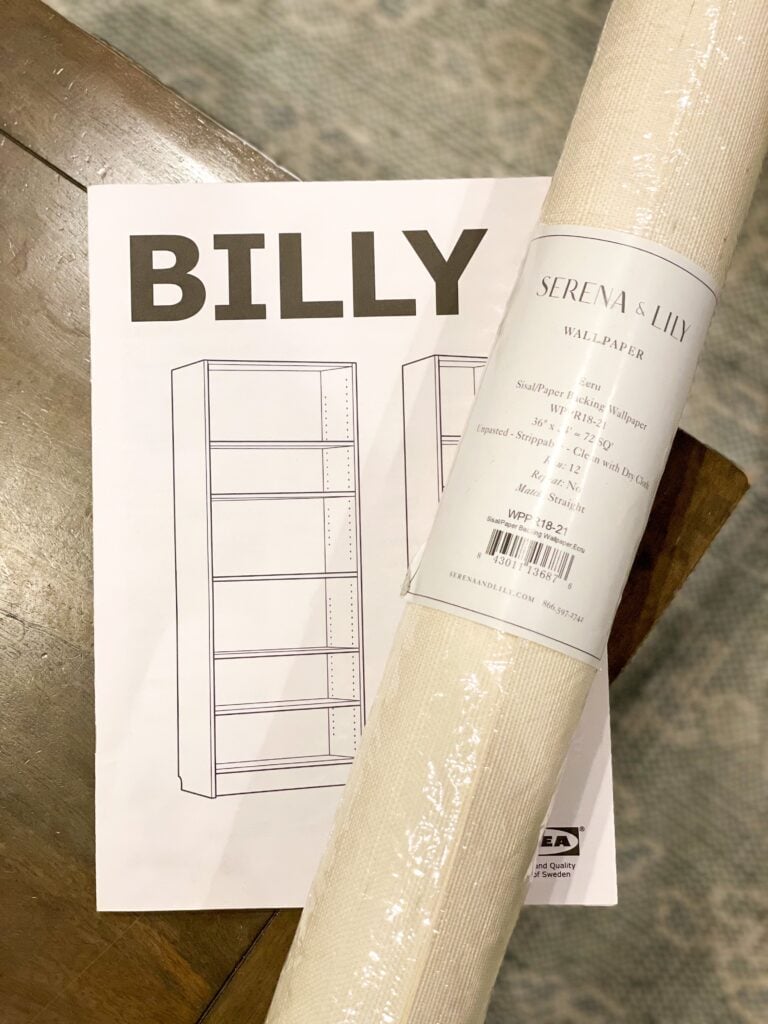
I wanted to put my own unique spin on the project by utilizing some Serena & Lily grasscloth wallpaper (picked up from the outlet) for the interior. I also wanted to try and replicate the handles from the original Kendzie Cabinet from Crate & Barrel, so I did what any super sleuth would do: emailed the company to figure out the exact dimensions of the handles on their cabinet (SERIOUSLY) and then screenshot the handles and ran a Google Lens search.
This led me over to Etsy, where I purchased, what I felt were, the best dupes out there and a similar size to the inspo cabinet handles. I ordered the medium (middle), but in hindsight, might have preferred the largest for a bigger statement. You be the judge.

Considerations for this IKEA Billy hack
I picked up the rest of my materials (click here to skip to materials) and got to work.
Before I jump into the tutorial, here is what I learned to do and what NOT to do. Please keep in mind, I am a DIY novice and I know I didn’t do every single thing “correctly.” This is just a plain ol’ gals guide to IKEA Billy hacks.
I ended up purchasing another set of doors (if you are curious to see why, check out the video below), and by this second round I was so over it I skipped a lot of steps the experts would say are necessary (HA!).
- This tutorial removes two of the shelves that comes with the bookcase. One I am saving for a backup shelf and the other was stacked INSIDE the bookcase at the bottom. Why? Since I am attaching feet, I needed something to screw them into, so I used an extra shelf for that.

- DO NOT purchase the white doors as I mentioned in the video. I initially got the white doors and bookcase because that was all my IKEA had in stock and it was cheaper (SCORE!). But, you can’t paint that spot inside the window pane black. See photo below. Spend the extra money and wait for the brown-black doors.

- In above photo you’ll also notice the paint started peeling. you need to be careful when painting Billy bookcase. I made the right call with taping off, BUT, if you do that, you’ll need to peel it off and add back new tape with every single coat you do. I laid it down once and by the time all my coats were done, it was sticking and peeling. Again, not a good look.
- Spray primer DID NOT work for us. It just kept shooting out clumps (we tried 5 different cans!) so if you want to primer, just paint it.
- The best wallpaper adhesive, for me, is the paste. I was warned AGAINST spray adhesive for the wallpaper, as it is less forgiving than the paste. If you use the spray, it’s going to cling instantly, whereas with the paste, you can slide it around a bit before it dries.
- Some have asked why I even painted and didn’t just get the darker IKEA bookcase. Although the color appears black online, is actually a black-brown color. I wanted a true black. If this doesn’t bother you, though, absolutely go this route to save some steps! Keep in mind, if you lay down a lighter wallpaper on the inside of the cabinet it will create a slightly darker interior, as the black brown color will bleed through a bit. I did recently use black stain on another IKEA black-brown piece and that worked well, so you can also consider that route (though I despise working with stain myself!).
- Keep in mind, the distance from the bottom to the middle and the middle to the top is slightly DIFFERENT. I think I built mine backwards, where the bottom distance is slightly smaller than the top distance. I would have preferred the opposite for balance purposes.
- The cardboard bookcase back panel that comes with the bookcase has two seams due to how they package it. These seams will show through slightly after the wallpaper is applied. If this bothers you, I advise coming up with a workaround.
IKEA Hack Bookshelf Materials
Some of the links below are affiliate links, meaning, at no additional cost to you, I may earn a little coffee money to help fuel more helpful blog posts like this!


- Billy Bookcase: I recommend purchasing in store if you can and selecting the white bookcase but the black-brown doors. If purchasing as a set, choose the black-brown.
- Etsy handles: size medium
- Amazon bookcase legs: 7 inch I wanted a taller leg and this fit exactly perfect lengthwise along the bookcase. Don’t size up any larger if the width also changes.
- Serena & Lily Wallpaper: color Ecru 1 roll is just enough for the whole project plus a bit extra; here is a cheaper Amazon alternative.
- Benjamin Moore Paint: Black (HC-190) This a premixed paint and a true black.
- Extra IKEA shelf: Two of the shelves are not needed. I utilized one as a backup and the second as a base for the bookcase, so the feet could screw into the base. More details in tutorial.
- Plywood top piece painted black for a more finished look. The dimensions we used- IKEA shelf size plus 1″ for the sides and front.
- Foam brush: 1 inch
- Foam Roller: 4 inch
- Painters tape
- Wallpaper paste
- Sealant adhesive
- Caulking
- 80mm sandpaper
- Dremel (if you don’t have one, first try using sandpaper or another hack for angling the edge!)
IKEA Billy Hack Prep
If you are anything like me (and I suspect you might be if you are doing a DIY), I’d prefer not to buy materials for a one-off project. We knew we needed a big wallpaper table for project, but that isn’t something we’d be likely to use again. We ended up putting an enormous piece of plywood over our kitchen table. TA-DA! Instant wallpaper table for free! 😉 We also used the cardboard from the doors on top of the plywood to not messy it up.

Step 0: This isn’t REQUIRED, but I actually recommend building the bookcase first so you can determine exactly where you want your shelves to go. MAKE SURE TO ALSO PUT THE DOORS UP! The distance from the bottom to the center and from the center to the top is NOT the same. This means, one of distances is going to need custom holes drilled in to make sure it is completely center once you put the wood grid on the glass. Jump to step 18 to see what I mean (we didn’t catch this discrepancy in sizing variations until the end).
Circle the front and back holes for the top, bottom, and center shelves of the bookcase, along with the holes where the adjustable shelves will be placed, so you know not to fill them in later down the road. Circle the smaller hardware holes in the center for the doors. You DO NOT need all four small holes. We messed this part up and left all four small holes and had to patch the wallpaper later on (so sad). They give you options based on how you orient the bookcase (see above Consideration points on what I mean here).

Billy IKEA Hack Steps
Step 1: Cut the base of the bookcase off. This will allow you to attach your bookcase feet toward the end of the project.


Step 2: When sanding IKEA furniture, give it a very light sanding with very fine grain sandpaper. We just used what we had on hand.

Step 3: Fill in any holes not being used for shelving or door hardware. Drill in the new hole if you are centering the window pane grid like mentioned above. Scrape and lightly sand any excess so bookcase side is smooth and level. If you are using light colored wallpaper, do not omit this step, as the holes will show through the wallpaper.


Step 4: Prep your doors and bookcase. We used paint primer on the bookcase, but only lightly sanded the bookcase doors (I skipped primer). I initially taped off but realized it was a little more high maintenance than I preferred since you’ll need to remove the tape and reapply between each coat (something I screwed up on my first set of doors). I ended up just taking a piece of paper and sliding it down the doors with me as a painted.

Painting a Billy Bookcase
Step 5: Paint the outer surfaces of the bookcase and doors. No need to paint the side that will face inside, as this part will get wallpapered. We did opt to paint a thin line on the inside edge of the top, bottom, and side pieces, though, to make sure that when the wallpaper was laid down there would be no white visible at that wallpaper end point. DO NOT make this line as thick as we did in the first photo, as there was some bleed through once the wallpaper was laid down. Make it more like photo 2.


How I paint IKEA Billy Bookcase
You want to know how to paint Ikea furniture without sanding? I preferred to use a small foam roller for the large areas and a 1 inch foam brush for the inside of the doors near the glass. This brush is angled so it really got in there well without much paint pooling, if you dab it like I show in this short video:
Step 6: Use fine sandpaper to give it a light sanding between coats (I did three coats of black paint). Do not sand on your final coat of paint! Make sure to paint the edges too, as they will be visible once assembled.

Cut Wallpaper
Step 7: The easiest wallpaper cutting tool is a simple blade. it is easy to manipulate and super cheap to buy. For cutting the wallpaper:
- Middle three shelves: Roll out the wallpaper and lay the shelf on it. Fold the wallpaper over the shelf to determine the size of wallpaper needed to cover the top, edge, and bottom of the shelf. You’ll wrap the shelf similar to wrapping a present. Carefully use a razor blade to cut the correct size of wallpaper.


- Top and bottom shelves: These shelves will be a bit different because of the black outer edge, so you cannot wrap like mentioned above. You only need to wallpaper the side facing inside the cabinet, as the outside will have been painted black since it is the outside of the cabinet.

- Bookcase side pieces: Cut the length of the bookcase pieces and split in half longways. This will be enough to cover both sides.
Apply Wallpaper Adhesive
Step 8: Brush the wallpaper glue onto the shelf. We opted to use wallpaper paste for our wallpaper adhesive instead of spray since it is more forgiving. Spread the glue generously (not too thin) and evenly.


Step 9: Carefully lay the wallpaper down. You’ll want to quickly work any air bubbles out. Start in the center and spread your hands out toward the edge. Repeat until satisfied (you may not be able to get out every single air bubble).


Step 10: Once the glue is dried, carefully razor excess wallpaper with razor blade.

Step 11: When wallpapering the side pieces of the bookcase, we decided to clamp the bookcase side and roll the wallpaper out, brushing on the wallpaper adhesives as we went. Do not put glue on the piece to the right (on my first photo below) of the long black line. This is the track for the back panel piece. You’ll see why in the next step.
Use something to poke where the un-caulked holes are so it won’t be confusing at the time of assembly. These holes are visible through the wallpaper on the white bookcase, but unsure if they would be if you choose to use the black-brown bookcase.


Step 12: Remove the excess wallpaper on the unglued side of the track with a razor blade. We decided to bend a small amount of wallpaper into the track, so that at time of assembly the overall look would be more seamless. We then razored away a small amount of the other side of the track so the back panel would still slide in easily.


Step 13: Assemble the bookcase per IKEA’s instruction (Godspeed) and screw the feet into the bottom of the bookshelf. Make sure your screw sizes won’t puncture through the wallpaper.


Step 14: We opted to remove the interior support in the original IKEA design and, instead, glued some support to the back so the inside could be seamless. I painted the back of this black for a more finished look.

Step 15: Glue your top board piece to give it a more high end finish. Caulk the seam and paint if not done already.

Step 16: Cut your 3/4″ wood trim pieces to make a grid in the center of the glass pane. use a Dremel to angle the edge so it’ll sit properly against the existing doorframe.


Step 17: Paint wood pieces.

Step 18: We applied a clear sealant to attach the wood pieces to the glass. Tape to ensure it won’t slide. Do you see how the shelf below is above the ACTUAL center of the window pane? IKEA has zero predrilled holes that line up centered. We had to drop it down and patch it so do this step BEFORE wallpapering. The bottom was fine. This is when we realized the top and bottom window panes weren’t the same size and -oh boy- was I doubting the project! Jump back up to step 0.

Step 19: If you need to patch any holes, cut some extra grasscloth wallpaper as small as you can and press into hole. I initially tried a hole punch but felt they looked too big and obvious.
Step 20: Use a razor blade to clean up any paint imperfections on the glass doors.

And that’s it! It was a labor of love and took waaayyy too long from start to finish, but I am thrilled with the results of my IKEA Billy hack.
UPDATE: I have had this DSIY Billy bookcase for 10 months and it is in excellent shape. I have had no issues with tipping, paint chipping, or any other issues. Reach out if you have any questions!


Talk soon,
Kelli


One Comment